


It’s been a while since I shared a Crunchy Beauty Tips post. This one is for anyone who likes to get a girly look without heat or harsh chemicals. If you enjoy natural hair ideas, keep reading.
As a child I often wished for hair that was completely unlike my own—stick-straight, reddish-brown locks that I longed to see transformed into bouncy curls or even an afro. Over the years I learned the hard way that dramatic color and texture changes can be more trouble than they’re worth. After some regrettable experiments with dye, I accepted my brown straight hair and occasionally enhanced it with henna or a semi-permanent color wash. I grew to appreciate the ease of straight hair, but every so often I still craved curls.
I tried many methods: perms, heated tools, bendy rods, and rollers. Perms left my hair frizzy and unhappy. Curlers and foam rods were uncomfortable to sleep on and often tangled my hair when removing them. Hot rollers worked but were time-consuming and impractical for my lazy-girl approach to styling. Then I remembered an old-fashioned trick I’d read about in a storybook—wrapping hair in fabric strips, or rag rolling. It sounded simple and gentle, so I decided to try it.
I cut several fabric strips around 2 inches by 8–10 inches, washed my hair, let it air-dry until just damp, and wrapped small sections around the rags, rolling each up toward my scalp. I wasn’t sure how comfortable I’d be sleeping on them—I’m particular about my bed—but I slept through the night without issue. In the morning I unrolled the rags and was delighted to find soft, natural-looking curls. I had used about ten rags, so my curls were defined but not uniform; I ran my fingers through them to separate and fluff, and the result looked effortless and fresh.
I spent the day feeling confident and playful—picnicking with the kids and enjoying the easy, bouncy style. The best part was that the method required no special tools, no heat, and no damage to my hair. It’s an ideal option for anyone with straight hair who wants temporary curls with minimal effort.
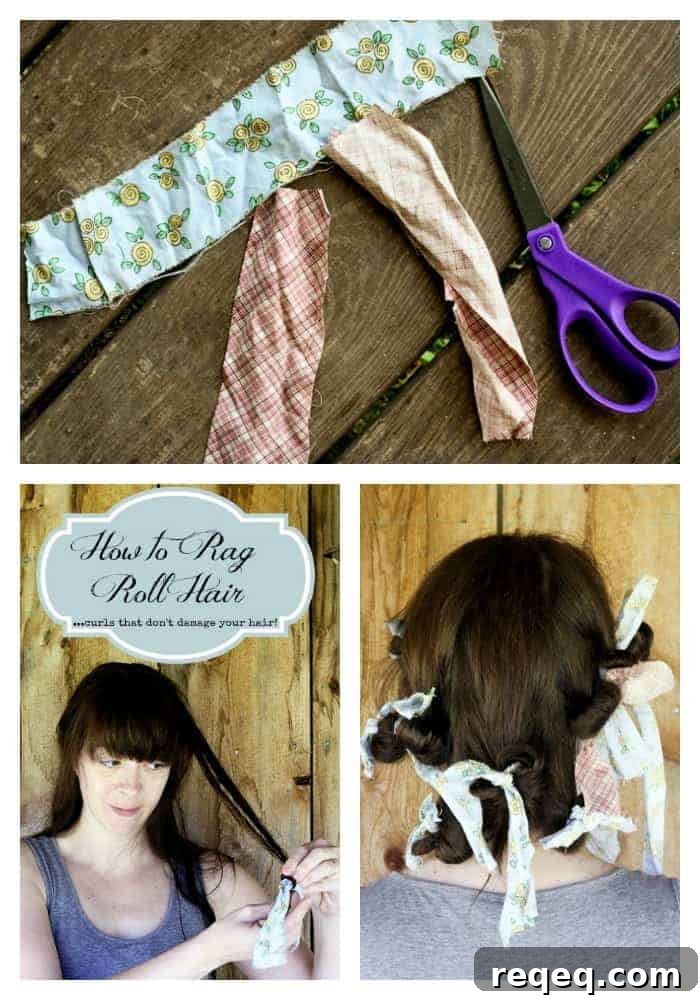
How to Rag Roll Your Hair:
- Cut 10–20 fabric strips about 2 inches wide and 8–10 inches long. Keep extra fabric and scissors nearby in case you need more strips.
- Start with damp hair—either air-dry after washing until slightly damp or spritz dry hair lightly. Avoid wrapping dripping wet hair.
- Use your fingers to detangle gently; don’t brush aggressively, as finger-combing preserves texture.
- Divide hair into sections. Smaller sections create tighter curls; larger sections yield looser waves.
- Place a rag about an inch from the ends of a section. Wrap the hair tail around the rag, hold the tail in place, then roll the rag up toward your scalp until the wound holds. Tie the rag into a secure square knot—comfortable enough to sleep on but not so tight that it’s hard to untie.
- Sleep on the rags overnight for best results. The fabric is comfortable and holds the shape while you rest.
- In the morning, untie each rag and unroll it gently. Remove all rags before assessing your style.
- Separate curls with your fingers to avoid frizz. Brushing will soften curls into waves if you prefer a looser look.
- If desired, finish with a light mist of hairspray to hold the style. Many people find their curls last for two days or more without product; on the third day you can style into a loose updo to refresh the look.
Rag rolling is an easy, heat-free way to achieve natural-looking curls with minimal cost and effort. It works well for a casual day out or when you want a soft, feminine style without risking damage. Try a few different section sizes and fabric types to discover the curl pattern you like best.